This is probably the first tutorial I've put together based on an image taken by my iPhone. With camera phones taking much better pictures nowadays, we can use our phones as a design tool to capture textures and images anywhere, which can then be used to create interesting effects in Photoshop.
STEP ONE: Here's a photo I took while I was driving across a bridge in Tampa, Florida. I was intrigued by the clouds in the sky and just knew I had to capture it. I figured it would make a good cloud brush, but once I started playing around with it, I discovered something even more interesting. By getting creative with some brush settings and some layer styles, we can create a brush that looks like a fiery explosion. Lefs first set up the clouds to create a custom brush.
Open the image provided or an applicable image of your own. The first thing you'll notice is that the light pole is in the way. Grab the Lasso tool (L) from the Toolbox and draw a selection around the light pole. Then, press Shift-Delete (PC: Shift-Backspace) to open the Fill dialog. Choose Content-Aware from the Use drop-down menu and click OK. This will remove the pole quickly and easily with no trace.
[NAPP members may download the image used in this tutorial from www.photoshopuser.com/members/janfebl 1-downloads.html. All files are for personal use only.]

STEP THREE: Open the Channels panel (Windows>Channels) and click on each channel one by one to locate the channel that shows the most contrast. Here it seems to be the Red channel. Drag the Red channel onto the Create New Channel icon at the bottom of the Channels panel to make a copy (Red copy). When creating a custom brush the darkest areas will be the most opaque areas of the brush, lighter gray areas will have some transparency, and white will be completely transparent. Since the highlighted areas of the clouds are what we want to be the brush, we need to invert this channel. Press Command-I (PC: Ctrl-I) to do this.

STEP FOUR: Now we need to fade the edges of the image to white so the brush doesn't have any hard edges. Select the Gradient tool (G) from the Toolbox, click on the down-facing arrow next to the gradient thumbnail in the Options Bar to open the Gradient Picker, and choose the Foreground to Transparent gradient. Select the Linear Gradient option in the Options Bar and set the Mode to Overlay.
 STEP FIVE: With the Red copy channel still active, press D to set the Foreground colour to white. Click-and-drag a gradient from the outside edge of the image to the outside edge of the clouds on all four sides of the image (to basically create a white border around the clouds). With the Gradient tool in Overlay mode, Photoshop will ignore the darkest areas of the clouds, so you can keep some of the dark detail that will be part of the brush. You may have to click-and-drag a couple more times to create some more gradients around the clouds to lighten the darker edges.
STEP SIX: Now we're ready to define the brush. Go under the Edit menu and choose Define Brush Preset. When prompted, give the brush a name (we used "Explosion" in this example) and click OK.
 STEP SEVEN: Now that we have the brush defined, we need to change the behaviour of the brush to achieve the effect we're looking for. Select the Brush tool (B) from the Toolbox and click on the down-facing arrow next to the brush thumbnail in the Options Bar to open the Brush Preset Picker. The newly defined brush will be at the bottom of the list. Click on the brush to select it and then click on the Toggle the Brush panel icon (small folder) in the Options Bar to open the Brush panel. Click on the words "Shape Dynamics" in the list on the left of the Brush panel and
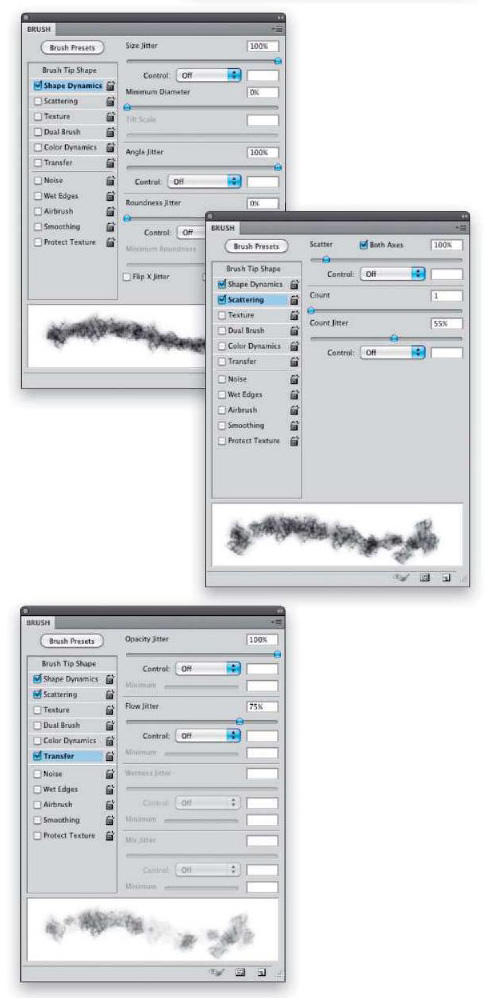
 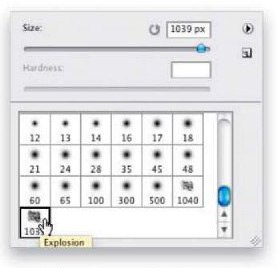 set the Size Jitter to 100%. Also, set the Angle Jitter to 100%. You can experiment with the Control settings if you're using a pressure-sensitive tablet, but it isn't necessary (in our example, we have our Control settings set to Off). Click on the words "Shape Dynamics" in the list on the left of the Brush panel and set the Size Jitter to 100%. Also, set the Angle Jitter to 100%. You can experiment with the Control settings if you're using a pressure-sensitive tablet, but it isn't necessary (in our example, we have our Control settings set to Off).
Next, click on the word "Scattering" in the list on the left and adjust the Scatter slider to 100%. Enable the Both Axes check-box and change the Count Jitter to 55%.
Finally, click on the word "Transfer" in the list or the left and set the Opacity Jitter to 100%. Also, set the Flow Jitter to 75%. Leave the Control settings to Off-feel free to experiment with the pressure-sensitive settings if you have a tablet.
STEP EIGHT: Now create a new 8x12" document and press Command-I (PC: Ctrl-I) to set the Background layer to black. Click on the Create a New Layer icon at the bottom of the Layers panel to create new blank layer. Then, click on the Add a Layer Style icon (fx) and choose Outer Glow.
 Click on the pale yellow colour swatch, set the colour to red (R:255, G:0, B:0), and click OK. Set the Blend Mode to Hard Light and the Opacity to 100%. Leave the Size at 5 px and the Technique set to Softer. Don't click OK yet.
Click on the words "Inner Glow" from the Styles list on the left side of the Layer Style dialogue and click on the pale yellow colour swatch. Choose an orange colour (R:255, G:145, B:0) and click OK. Set the Blend Mode to Hard Light and the Opacity to 100%. Click OK to apply the two layer styles.
STEP NINE: Make sure the Foreground colour is still set to white and start painting with the new brush (use the Left and Right Bracket keys on the keyboard to resize the brush it necessary). Notice as you paint repeatedly, the effect of a fiery explosion starts to take shape. Pretty cool, huh? Here we have an example of using a brush to create an explosion effect completely from scratch by using a picture of a cloud I shot with my iPhone while on a Sunday drive.This just proves you never know when or where inspiration will strike you. Always be on the lookout!

Немає коментарів:
Дописати коментар