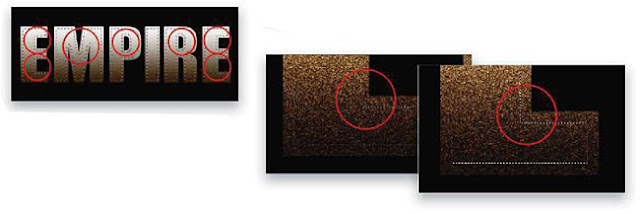
"Atlantic City, 1920: When alcohol was outlawed, outlaws became kings."What an awesome line! It's the headline copy used on the print ads for HBO's new series Boardwalk Empire. Not only is the headline great but the technique used on parts of their logo treatment is equally as cool. Check it out.
STEP ONE: In a new 12x4", 150-ppi document, press D to set the Foreground colour to black, and then press Option-Delete (PC: Alt-Backspace) to fill the Background layer with black. Press X to change the Foreground colour to white. Choose the Type tool (T) and enter your text (we're using the font Impact Regular at 246 points).
STEP TWO: Click on the Create a New Layer icon at the bottom of the Layers panel to add a new layer(Layer I). Click on the Foreground colour swatch at the bottom of the Toolbox, choose a dark brown colour (R:63, G:54, B:36), and click OK. Command-click (PC: Ctrl-click) on the text layer thumbnail to load it as a selection. Choose the Gradient tool (G) Click on the gradient thumbnail in the Options Bar, choose the Foreground to Background Preset, and click OK. Click-and-drag a gradient from the top of the selection toward the bottom of the selection. In the Layers panel, click on the Eye icon to the left of the text layer thumbnail to hide it from view.
STEP THREE: Add a new layer (Layer 2). Change the Foreground colour to white and the Background colour to a dark brown (R:62, G:37. B:12). Click-and-drag a gradient from the top toward the bottom of the selection. Choose Filter>Noise>Add Noise. Enter 8% for the Amount and click OK.
STEP FOUR: Go under the Select menu and choose Modify>Contract. Enter 15 pixels and click OK
STEP FIVE: You'll notice some of the edges of the selection are cut off or rounded. To correct this, choose the Rectangular Marquee tool (M) from the Toolbox, hold down the Option (PC Alt) key, and click and drag over the areas you wish to subtract or remove from the current selection (see example).

STEP SIX: Press Delete (PC: Backspace) to delete the center portion of the gradient. Press Command-D (PC: Ctrl-D) to deselect. Click on the Add a Layer Style icon (fx) at the bottom of the Layers panel and choose Inner Glow. Choose Multiply for the Blend Mode and enter 40% for Opacity. Click on the yellow color swatch, choose black as the color, and click OK. Choose Edge as the Source, enter 10% for Choke, and 5 px for Size. Click on the down-facing arrow next to the Contour thumbnail and choose Cone-Inverted.
STEP SEVEN: Choose Gradient Overlay from the Styles list on the left side of the Layer Style dialogue. Choose Overlay as the Blend Mode and click on the Gradient thumbnail. When the Gradient Editor dialogue appears, choose the Foreground to Transparent Preset. Double-click the white colour stop under the gradient bar on the left, choose a brown colour (R:129, G:80, B:33), and click OK three times to apply the two layer styles.
STEP FEIGHT: Create a new layer (Layer 3) and set the Foreground colour to white. Select the Elliptical Marquee tool (nested under the Rectangular Marquee tool). Hold down the Shift key to constrain the selection and draw a circular selection over the top-left corner of the first character. Press Option-Delete (PC: Alt-Backspace) to fill the selection with white. Press Command-Option-T (PC: Ctrl-Alt-T) to bring up the free transform bounding box. Hold down Shift and move the selection toward the right and press Return (PC: Enter) to apply the transformation and duplicate the selection. Press Command-Option-Shift-T (PC: Ctrl-Alt-Shift-T) to step and repeat. Repeat until you fill the top row over the first character.
STEP NINE: Command click (PC: Ctrl click) on Layer 3 to load it as a selection. Press Command-Option-T (PC: Ctrl-Alt-T). Hold Shift and move the selection down. Press Return (PC: Enter). Press Command-Option-Shift-T (PC: Ctrl-Alt-Shift-T) to step and repeat. Fill the entire area over the character. Deselect. Select the Eraser tool (E) and remove the circles outside of the character's inner edges. Repeat Steps Eight and Nine to fill the areas over the rest of the text (Layers 4-8). When finished, Shift-click on Layer 3 to select all the dot layers in the Layers panel and choose Layer>Merge Layers to merge them all into one layer (Layer 8).
STEP TEN: Click on the Add a Layer Style icon at the bottom of the Layers panel and choose Outer Glow. Click on the pale yellow colour swatch, choose a golden yellow color (R:252, G:222, B:131), and click OK. Enter 12 px for Size. Click on the words "Inner Glow" in the Styles list. Choose Normal as the Blend Mode, click on the color swatch, choose the same golden yellow color (R:252, G:222, B:131), and click OK. Enter 10 px for Size and click OK to apply the two layer styles.
STEP ELEVEN: Create a new layer (Layer 9) and change the blend mode to Multiply. Change the Foreground color to brown (R:104, G:53, B:29] and select the Brush tool (B). Using a sofl-edged brush and vaiying opacities (to darken some lights more than others), paint over some of the lights on the lower-right side of the logo to darken them (see example). Note: You can create an additional layer with the blend mode set to Multiply if you want to really darken some of the lights.
STEP TWELWE: Create a new layer (Layer 10) and change the blend mode to Overlay. Set the Foreground color to white. Once again, using a soft edged brush, paint over some of the lights on the logo to give the appearance that these lights are glowing brighter than the others (see example).
STEP THIRTEEN: Create one more new layer (Layer 11) and change the blend mode to Overlay once again. Now, using a soft-edged brush, paint in some really bright hot spots (see example) to complete the effect.


Немає коментарів:
Дописати коментар