STEP ONE: Create a new 4x6", 150-ppi document, press D to set the Foreground color to black, and then press Option-Delete (PC: Alt-Backspace) to fill the Background layer with black. Press X to change the Foreground color to white, select the Type tool (T), and enter your text. (We're using the font Harry P, Regular, at 163 pt.) Adjust the baseline shift of the "P" and the "9" in the Character panel (Window>Character) to offset them from the "H." Go to Edit > Free Transform and drag the bottom middle bounding box handle to stretch the text. Click the Commit icon (checkmark) in the Options Bar when finished. Click on the Add a Layer Style icon (fx.) at the bottom of the Layers panel and choose Inner Glow. Choose Overlay for Blend Mode and enter 100% for Opacity. Click on the yellow color swatch, choose white as the color, and click OK. Enter 10% for Choke and 10 px for Size (you won't see any difference just yet). Note: There are several Harry Potter style fonts that will work for this tutorial, or you can just choose a bold, serif font for best results.

STEP TWO: Click on the words "Bevel and Emboss" in the Styles list on the left side of the Layer Style dialogue. Choose Chisel Hard for Technique, enter 25% for Depth, and 20 px for Size. Uncheck the Use Global Light check-box, enter 20° for Angle, and 10° for Altitude. Click on the down-facing arrow next to the Gloss Contour thumbnail and select the Gaussian contour. Check the Anti-Aliased check-box, and raise the Shadow Mode Opacity to 100%. Choose Colour Overlay from the Styles list. Choose Overlay as the Blend Mode, click on the red colour swatch, select a light tan (R:187, G:143, B:1141, and click OK. Choose Gradient Overlay from the Styles list, set the Blend Mode to Linear Burn, enter 25% for Opacity, choose Reflected for Style, and lower the Scale to 50%.

STEP THREE: Choose Pattern Overlay from the Styles list. Choose Multiply as the Blend Mode and click on the down-facing arrow next to the Pattern thumbnail. Click on the right-facing arrow in the Pattern Picker and select Artistic Surfaces. Click Append in the resulting dialogue and choose Washed Watercolour Paper. Click OK to apply the five layer styles.

STEP FOUR: Create a new layer (Layer 1) by clicking on the Create a New Layer icon at the bottom of the Layers panel Command-click (PC: Ctrl-click) on the text layer thumbnail to load it as a selection. Choose the Lasso tool (L). Hold down the Option (PC: Ctrl) key to subtract from the current selection and remove portions of the selection that are over the highlight areas (use the style you just created as a guide). You should be left with a selection of just the shadow areas (see example). Click on the Foreground color swatch, choose a gold color (R:200, G:154, B:89), and click OK. Press Option-Delete (PC: Alt-Backspace) to fill the selection. Change the blend mode to Overlay in the Layers panel. Press Command-D (PC: Ctrl-D) to deselect.

STEP FIVE: Click on the Add a Layer Style icon and choose Inner Shadow. Enter 100% for Opacity and 8 px for size. Choose Gradient Overlay from the Styles list. Choose Overlay as the Blend Mode, enter 58° for Angle, and click OK to apply the two layer styles.

STEP SIX: Create a new layer (Layer 2). Command-click (PC: Ctrl-click) on the text layer thumbnail to load it as a selection. Choose the Lasso tool from the Toolbox. This time, subtract the portions of the selection that are over the shadow areas (see example). Click on the Foreground color swatch, choose a gray color (R:162, G:161, B:167), and click OK. Press Option-Delete (PC: Alt-Backspace) to fill the selection. Deselect.

STEP SEVEN: Double-click on Layer 2 in the Layers panel to open the Layer Style dialogue. Choose Drop Shadow from the Styles list (the default settings work perfectly). Choose Inner Shadow from the Styles list. Choose Overlay as the Blend Mode, uncheck the Use Global Light check-box, and enter -42° for Angle. Choose Inner Glow from the Styles list. Choose Overlay as the Blend Mode and enter 85% for Opacity. Click on the yellow colour swatch, choose white as the colour, click OK. and enter 10 px for Size. Choose Gradient Overlay from the Styles list. Choose Linear Burn for the Blend Mode, enter 25% for Opacity, and choose Reflected as the Style. Choose Pattern Overlay from the Styles list Choose Multiply as the Blend Mode, click on the down-facing arrow next to the Pattern thumbnail, choose Washed Watercolour Paper, and enter 125% for Scale. Click OK to apply the five layer styles.

STEP EIGHT: Create a new layer (Layer 3). Set the Foreground colour to a darker gray (R:147, G:149, B:152) and press Option-Delete (PC: Alt-Backspace) to fill the entire layer with the Foreground colour. Go to Filter>Noise>Add Noise. Enter 400% for Amount and click OK. Choose Filter>Blur>Motion Blur. Enter 52° for Angle, 180 px for Distance, and click OK. Go to Filter>Sharpen>Smart Sharpen. Enter 500% for Amount and click OK.

STEP NINE: Command-click (PC: Ctrl-click) on the text layer thumbnail to load it as a selection. Click on the Add Layer Mask icon at the bottom of the Layers panel. Change the blend mode to Overlay in the Layers panel and lower the Opacity to 50%.
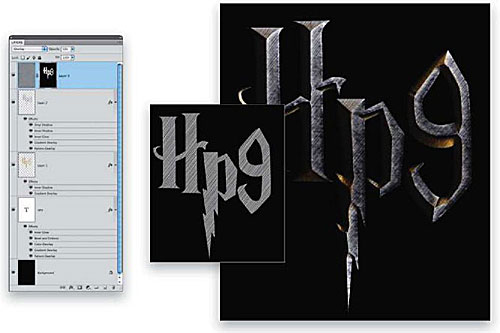
STEP TEN: Create a new layer (Layer 4) and change the blend mode to Overlay. Command-click (PC: Ctrl-click) on the Layer 2 thumbnail to load it as a selection. Set the Foreground colour to white and choose the Brush tool (B). Using a soft-edged brush, paint in highlight areas above the centre chiselled edge of the individual characters. Add some smaller, thinner highlights to the right side of each character as well (see example). Deselect.

STEP ELEVEN: Create a new layer (Layer 5) and change the blend mode to Overlay. Command-click (PC: Ctrl-click) on the text layer thumbnail to load it as a selection. Once again, using a soft-edged brush, paint in highlight areas over the top left portion of each character and over any other areas you wish to have a slight highlight (see example). Deselect to complete the effect.


Немає коментарів:
Дописати коментар